

You can use your Mac with different user accounts. These accounts differ from each other in terms of using and managing the system. But among these accounts, there is one that is authorized to do almost everything. We call this account the Root Account.
Before diving deep into the topic, let’s briefly go over the account types found in macOS:
- Administrator: This is the first account created. It generally has the authority to change system settings, install any application on the computer, and perform system updates. It can be created by Setup Assistant during the initial computer setup, or from System Settings > Users & Groups after the computer is set up.
- Standard: This is the most suitable account for general use. It can perform many tasks. It can install applications through the App Store. It can change settings related to its own user, except for settings that affect the entire system. Standard accounts can be created from System Settings > Users & Groups.
- Guest: Designed for users who need to use your computer temporarily. It is disabled by default. Login access and access to shared folders can be granted. When the user logs out, all created files are automatically deleted. Guest accounts can be activated from System Settings > Users & Groups.
- Sharing: This is an account type that has no login capability on the computer and is used solely for sharing purposes. When you want to share a file or folder on your computer’s disk, you can define a Sharing user by adding an ACE (Access Control Entry) line to the permissions, allowing other users to access the file with these user credentials. Sharing accounts can be created from System Settings > Users & Groups.
If we need to make a hierarchical ranking, we can write it as follows: Root > Administrator > Standard > Guest
…And the Star of Our Article: Root
It is the most privileged account in macOS, sitting above even the Administrator account. Users who only have Windows experience should not have found anything unfamiliar up to this point in the article. But one of the points where macOS differs from Windows is the Root account. On a Mac, the highest-level privileged user is not the Administrator but Root. When necessary, you can restrict Admin accounts from various operations. You can see an example of this in our article on how to prevent Admin users from installing applications.
Root Account can change any setting without being subject to any restrictions. It has read and write permissions everywhere except folders protected by SIP. Under normal circumstances, you cannot log in to the computer with the Root account. Login permissions can be granted by the Directory Utility application located at Macintosh HD / System / Library / Core Services / Applications. But this is not something we would recommend for general use.
When you want to perform an operation with Root privileges while using your computer with an Admin-privileged user, you can do this through the Terminal application using commands that start with sudo.
Enabling Login for the Root Account
As we wrote above, this is not recommended. Let us write it once more — enabling login for Root is not recommended. But if you still want to experience this on a test Mac or in a VM environment, you can follow these steps to enable the Root account for login:
- Open the application called Directory Utility located in the Macintosh HD/System/Library/Core Services/Applications folder.
- Click the lock icon in the bottom-left corner of the window that opens and enter your Admin username and password.
- From the Edit menu, issue the Enable Root User command.
- Set a password for the Root user. Confirm and close the window.
- Log out of your current user and log in to your computer with the Root user. The username will be Root; the password will be the one you set in Directory Utility.
For testing purposes, you can try using one of the commands in the System Settings application that asks you to enter your Admin password. You will see that it performs the action without asking for a password. For example, you can try changing the Gatekeeper setting to App Store only from the Privacy & Security section.
In the first lines of this article, we wrote that the Root account is authorized to do “almost” everything. The keyword here is “Almost.” Because whether you use your computer as Admin and use sudo commands, or give the Root user login permissions through Directory Utility, there are some areas you cannot touch and some operations you cannot perform. Because those areas are protected by SIP, which stands for System Integrity Protection. For example, even if you have activated the Root account by following the steps above, you will find that you cannot delete applications like Preview or Calculator from the Applications folder. Because they are protected by SIP.
What Is This SIP?
SIP is a security mechanism that protects certain folders from even Root-level interventions to ensure the security of the operating system. The following locations are protected by SIP:
- /System
- /usr
- /bin
- /sbin
- /var
- All applications installed as standard with macOS.
If you want to see the complete list of all files and folders protected by SIP, you can examine the file named Rootless.conf located in the Macintosh HD/System/Library/Sandbox folder.

If you examine the Rootless.conf file a bit, you can see that the SystemPolicyConfiguration folder for Configuration Profile files is also included in this list. In summary, SIP ensures the security of the operating system and has many areas it protects.
If for any reason you want to disable SIP (not recommended), you can do this from the Terminal in Recovery Partition. You simply need to follow these steps:
- Boot your computer from Recovery Partition. If your computer has an Intel processor, you can do this by holding Command+R during startup; if it has an Apple Silicon processor, hold the Power button during startup.
- After your computer boots from Recovery Partition, open Terminal from the Utilities menu.
- Type the following command in Terminal:
csrutil disable
When you restart your computer, SIP protection will have been removed from the folders listed above.
If you want to re-enable SIP, repeat the steps above and this time type csrutil enable.
How Can I Protect the SIP That Protects My Computer?
If you are a system administrator and do not want users to disable SIP on their own, there are three methods to accomplish this:
- If your users are using their computers with Standard user privileges, even if they boot from Recovery Partition, they will need minimum Admin privileges to perform any operation there. Thus, they cannot disable SIP.
- If your users are using their computers with Admin privileges but FileVault is enabled on the computer, they still cannot perform any operations in Recovery Partition.
- If you activate Firmware Password protection for Intel Macs or Recovery Lock protection for Apple Silicon Macs, you will completely block users from entering the Recovery environment.
Summary
Disabling SIP and activating the Root user to use your computer with Root privileges will lead to various security vulnerabilities. Taking various precautions to prevent users from doing these things on their own and creating some warning mechanisms on the Macs you manage can be beneficial.
I would like to give a small example of these warning mechanisms from Jamf Pro. You can use similar structures for the MDM solution you use.
In Jamf Pro, you can create a Smart Group from the Computers > Smart Computer Groups section and by setting the search criteria to System Integrity Protection as Disabled, you can obtain a list of all computers that have SIP disabled.
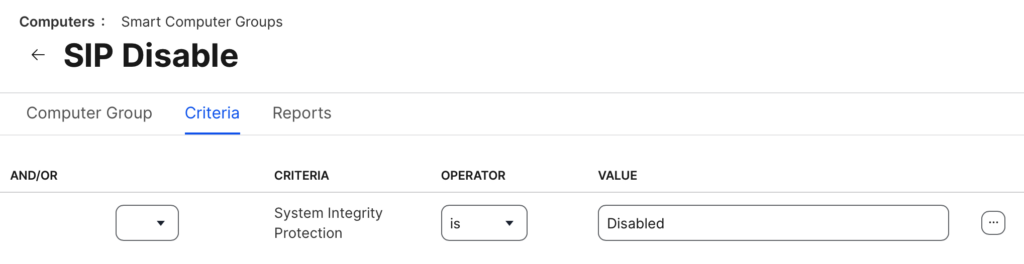
Photo by Tommy van Kessel on Unsplash
Leave a Reply