

Which of the iCloud services do you use? A long time ago, in a galaxy far, far away, when the cloud service called .Mac — the ancestor of today’s iCloud — started, it provided synchronization of very basic services like bookmarks, address lists, calendars, etc. Over the years, as .Mac evolved into MobileMe and MobileMe into iCloud, new services were continuously added. Today we can synchronize photos, passwords, notes, messages, application data, and much more data between the iCloud service and our Apple devices.
Among the iCloud services we can use, there is also a service called Desktop & Documents that allows you to access the data on your Mac even when you are not at your Mac. When you activate this, all the content of the desktop and documents folders on your computer is uploaded to iCloud. You can always access the data in these two folders from, for example, your iPhone and even a Windows computer.
This may provide very useful functionality for end users. But in the corporate world, in order to use the iCloud Desktop & Documents service, the organization must first be granting users permission to use iCloud on its own devices. And usually IT administrators tend to flee from iCloud services as if they’ve seen a bogeyman. Yes, when needed, Managed Apple Accounts can be used company-wide. And Desktop & Documents folder synchronization can even be done with Managed Apple Accounts. If it is specifically desired that the Desktop & Documents service be managed centrally as well, it can be managed via MDM using the allowCloudDesktopAndDocuments key.
But to put it plainly, IT administrators — if they are going to use a cloud storage service — generally prefer to use / have users use services within their own area of control. Like Microsoft OneDrive and Google Drive… And these types of cloud storage services can also be used to synchronize the Desktop and Documents folders.
Why Is This Important?
Because in an ideal working environment, corporate data should stay on company resources. It is not really an acceptable situation for the only copy of a sales report, on which one of a company’s sales specialists spends all their time, to be located on that person’s computer. In fact, in this context, if the user does not have a special requirement, there is no need to prefer MacBook Pros with very high disk capacity among the computers to be purchased corporately. Users already have 1 TB of space on OneDrive. And this corresponds to the highest disk capacity in the MacBook Pros you can buy if you do not prefer to make a custom configuration.
Another use case can be given from device replacement times. Corporate companies renew the computers in their inventory every few years. When device replacement time comes, having all of a user’s data in the cloud rather than locally on the computer speeds up the transition. Yes, of course macOS has a built-in Migration Assistant and, bless it, helps move all your data. But the question is: why should there be a need to move all the data at all?
How Will We Sync the Desktop and Documents Folders with OneDrive?
For this, you need three things:
- The OneDrive application must be installed on users’ computers.
- An edited .plist (property list) file for the OneDrive application.
- The Tenant ID information of your corporate Entra ID account.
With MDM solutions, you are not limited to just sending applications to the devices you manage. You can also prepare and send the settings for how the application you send will work. This way, users use corporate applications in the manner you have determined and cannot make any changes to the centrally sent settings.
Plist files contain the preferences that determine how applications will work. When you open any application and change a preference for that application from within the graphical interface, this change is written to the .plist file. If that file is not deleted from its location, the application it belongs to opens each time with the settings written in the .plist file.
You can access the complete list of all manageable keys for the OneDrive application at this address.
As you can see from the link I shared above, there are many settings, from allowing certain Tenants and blocking others, to configuring usage in Offline mode. The name of the key group we will use to synchronize our Desktop and Documents folders is KFM (Known Folder Move).
In the article I shared, there is an important detail that Microsoft draws attention to. There are actually two separate versions of OneDrive: the App Store version and the Standalone version. OneDrive downloaded from the App Store is a sandboxed application. Application Sandboxing is used by Apple to control applications’ access to system resources in order to enhance system security. Apple developed this first on iOS, then moved it to the Mac side. Because the App Store version is sandboxed, the scope of the .plist file and its location within the system are different from the Standalone version.
You can download the Standalone version of OneDrive at this address. After the application is installed, once you run it and close it, you can find the .plist file at /Users/username/Library/Preferences/com.microsoft.OneDrive-mac.plist.
As I wrote in the lines above, the name of the key group we will use is KFM. The following keys are available to manage in this group:
KFMOptInWithWizard
KFMBlockOptIn
KFMBlockOptOut
KFMSilentOptIn
KFMSilentOptInWithNotification
KFMSilentOptInDesktop
KFMSilentOptInDocuments
Among these keys, KFMOptInWithWizard will display a screen to the user asking “Do you want to sync your Desktop and Documents folders?” After the user makes their choice, synchronization begins.
The KFMSilentOptIn key enables the known folders to be synchronized directly without informing the user.
Conversely, the KFMBlockOptIn option will prevent the user from being able to use this feature.
The KFMBlockOptOut key forces users to back up their Desktop and Documents folders to OneDrive. When this option is enabled, users see the warning “Your IT Department does not allow you to stop folder backup.”
Usage with Microsoft Intune
Actually, up to this point in the article I have talked about editing the .plist file and the keys to be changed, but depending on the MDM you use, it is possible to change these settings without editing the .plist file. If you use Intune as your MDM, your job is relatively easier. Because Intune includes the necessary settings to configure Microsoft applications like Office applications, Edge Browser, and Defender.
After issuing the Devices > Configuration > Create > New Policy command, you should select macOS as the platform and find the Microsoft Office > Microsoft OneDrive option within the Settings Catalog.
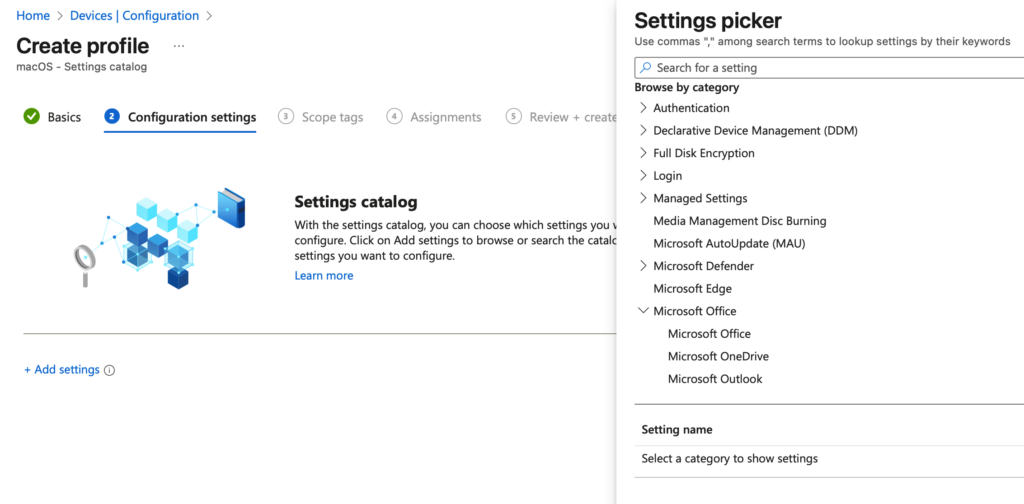
When you look among the OneDrive settings, you will notice that some options have (Known Folder Move) written in parentheses next to them. If you check the “Prompt users to enable the Folder Backup feature (Known Folder Move)” option, a warning toward backing up the Desktop and Documents folders will appear to the user during OneDrive’s first launch. This setting is the KFMOptInWithWizard key I mentioned in the lines above.
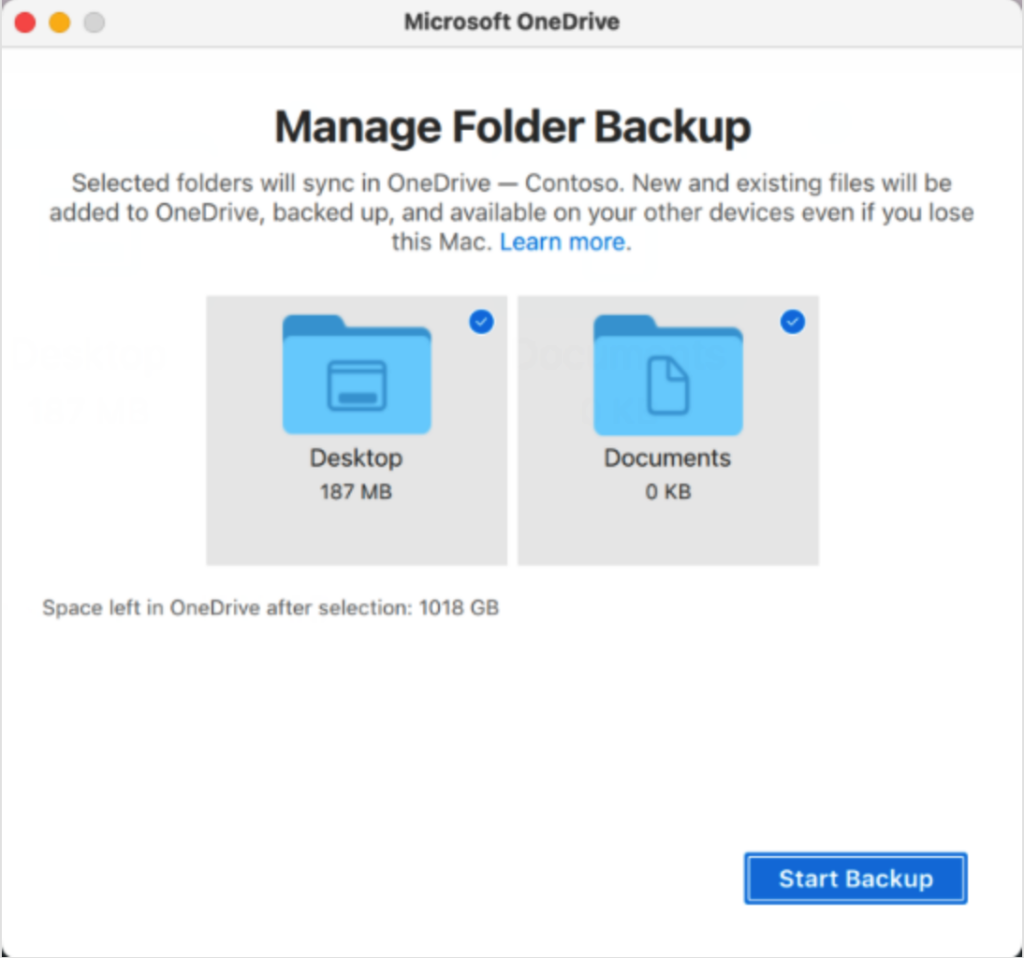
The only piece of information you need to have to complete this setting is your Entra Tenant ID. You can find this ID on the Overview page when you log in to Entra. You can copy your Tenant ID and paste it into the box next to the “Prompt users to enable the Folder Backup feature (Known Folder Move)” option you activated among the OneDrive settings in Intune.
There is one more point you need to think about before giving the command to back up all of your users’ Desktop and Documents folders to the cloud: network infrastructure. In this period when the remote-work effect of the COVID era is gradually returning to a hybrid model, if a significant portion of employees are in offices, it would be beneficial to also configure the Bandwidth settings before sending the OneDrive settings to 500 people at once.
With this setting, whose name in Intune is Automatic upload bandwidth percentage and whose key name is UploadBandwidthLimited, you can select how much data each OneDrive application can upload to the server.
Usage with Kandji, Jamf Pro, and Other MDMs
In the heading above, I mentioned that OneDrive settings are already available within Intune. This is not the case in many other MDM solutions. But even so, you do not need to manually edit the .plist to configure the settings of such popular applications. Because we have iMazing Profile Editor at hand. You can prepare configuration profiles containing all the manageable keys for popular applications like OneDrive with iMazing Profile Editor and distribute them with the MDM solution you want. Of course, that MDM solution must allow uploading .mobileconfig files from outside.
You can reach the Microsoft OneDrive settings by opening iMazing Profile Editor and typing “OneDrive” in the search box at the top right. You can start configuring your profile by clicking the +Add Payload button.

On the screen that opens, scroll to the bottom and enter your Entra Tenant ID into the Silently Move Known Folders field. If you want a warning about backing up the Desktop and Documents folders to OneDrive to appear to users, you can also enter the same Tenant ID into the Prompt Users to Move Known Folders box.
Check the Silently Opt In Desktop to Known Folders, Silently Opt In Documents to Known Folders, and Block KFM Opt-out options. This way, the Desktop and Documents folders are backed up to OneDrive and the user cannot turn off this setting.
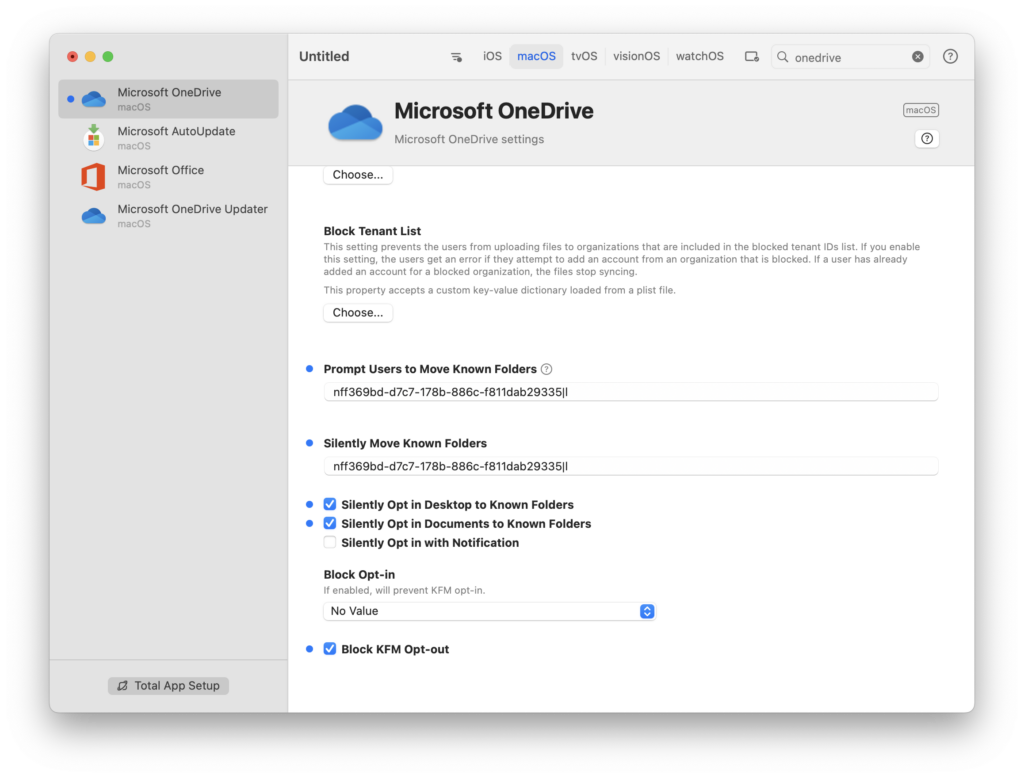
Finally, give this profile a name from the General section of iMazing Profile Editor and fill in the Identifier information. To prevent users from manually deleting this profile, you can also activate options like Prevent users from removing this profile.
You can save the profile with the File > Save command.
Photo by José Ramos on Unsplash
Leave a Reply