

When managing Mac fleets with an MDM solution, you may need to learn the Process Name information of the applications installed on user computers. You can most commonly use these Process Names when you want to restrict the use of an application. In addition, you can use them for many purposes such as accessing application-based usage data or performing log checks through the Console application.
The Process Name information of applications can be seen in the leftmost column of the Activity Monitor application (Macintosh HD/Applications/Utilities/Activity Monitor).

But instead of checking the names of applications one by one, to learn the Process Names of all active applications and tasks, you simply need to open the Terminal application and type the following:
ps -acxThis short code will give you the full Process Name information of all applications and tasks running on your computer in a long list. There is an important point you need to know here. For example, if you are going to apply a restriction to block the use of the Microsoft Edge browser in your organization, you will need the Process Name information of the Microsoft Edge browser. However, if Edge is not installed and running on your own computer, it will not appear in the results returned by the ps -acx code. For this reason, my recommendation is to first install and run the application you will restrict on your own computer, and then use the ps -acx command.
If you want to get a list that also shows the locations of these applications and tasks in the system, you can use the same code with this small addition:
ps ax -o commIf you want to filter out all the tasks that macOS runs and limit it to only the applications in the Applications folder that you installed, you can use this code:
ps ax -o comm | grep -E "^/Applications"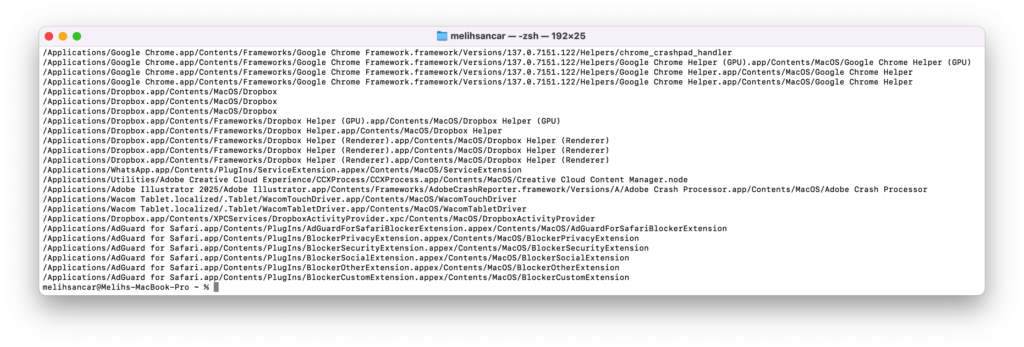
Now let’s use a Process Name we obtained to restrict an application. I will explain how you can do this with Jamf Pro and Kandji in turn.
Restricting an Application with Jamf Pro
- Navigate to the Computers / Restricted Software section.
- Click the + New button in the upper-right corner.
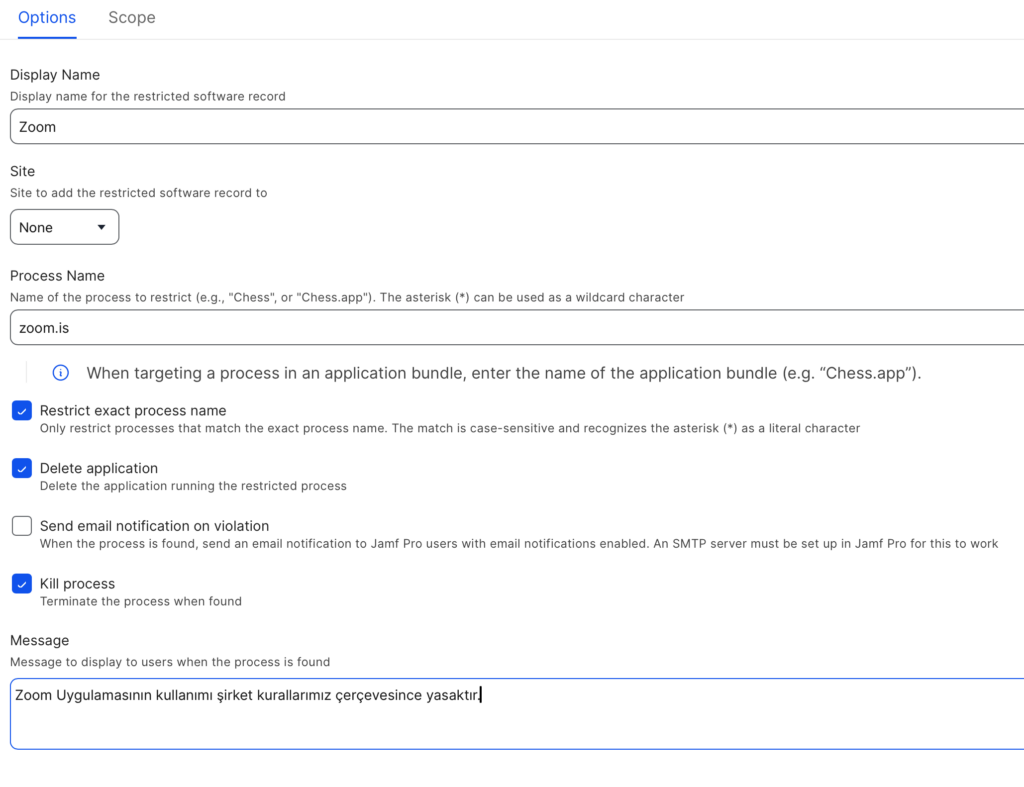
- On the screen that opens, you can write the name of the application you want to restrict in the Display Name section however you like (uppercase/lowercase, punctuation marks, etc.).
- In the Process Name section, you must write the exact name you obtained from the codes above. For example, you should write the name of the Zoom application not as Zoom, but as zoom.us, as it appears in its Process Name.
- You can check the Restrict Exact Process Name option. This option ensures that the exact name you wrote is used, if you are sure of the Process Name.
- If you also want the restricted application to be deleted, you can check the Delete Application option.
- If you have configured an SMTP mail server for notifications in Jamf Pro, you can check the Send email notification on violation option to have an email sent to you in case of violations.
- The moment you send this restriction, if the application you restricted is open on some of the users’ devices, you can check the Kill process option to close them and write your desired message in the Message section.
Restricting an Application with Kandji
- To restrict an application with Kandji, log in to the portal and select Library from the left column.
- On the screen that opens, click the Add Library Item button in the upper-right corner.
- A page containing all available library items will open. Among the options here, select the App Blocking option. If you cannot see it, you can also use the search box.
- After selecting the App Blocking option, click the Add and configure button in the bottom-right corner of the screen.
- On the screen that opens, you can write the name of the application you will restrict at the top however you like (uppercase/lowercase, punctuation marks, etc.).
- Under the Assignment heading, you can determine which Blueprint scope you will include this restriction in.
- In Kandji, unlike Jamf, you can restrict the application by its Process Name, by the path where it is installed, by its Developer ID, or by its Bundle ID. You can enter the Process Name by selecting the Add Process option. From the Match Type menu right next to it, you can select the Exact option.
I especially recommend trying the Developer ID section as well. It allows you to restrict all applications published by a developer. For example, if you want to block all applications developed by Microsoft on the Macs you manage, you can accomplish this by entering Microsoft’s Team Identifier information (UBF8T346G9) into the Developer ID section. - After writing your desired message in the message field, you can redirect users to a specific URL so they can get more information on this matter. After writing the button name and the informational URL at the bottom, you can click the Save button.
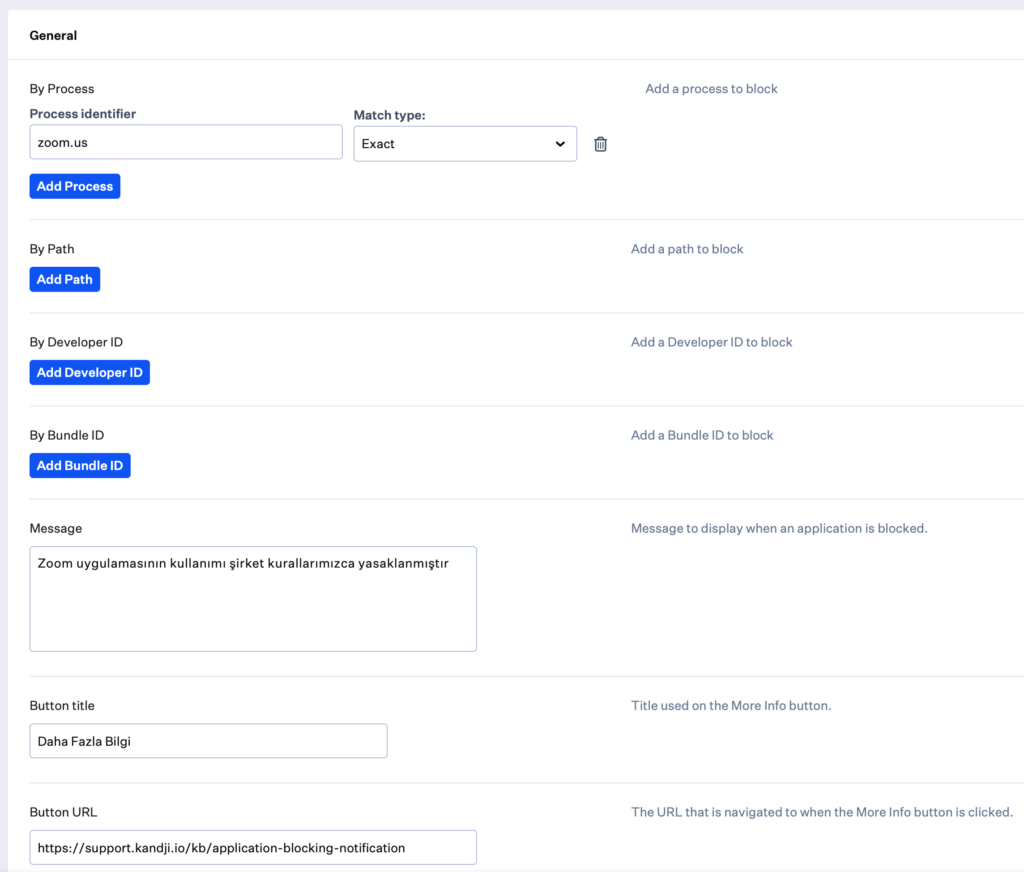
Photo by Kyle Glenn on Unsplash
Leave a Reply